
Tuesday, 13 December 2016

Monday, 12 December 2016
Penguin Animation
In order to produce this animation I started with the modelling of my character. I have a male and a female character but I used the same model for both and I only added a pink ribbon bow on the head of the female penguin, which I did not model myself because it was a last minute touch. I gave my model a simple rig with controllers that provided me with the freedom of movement. This is how my rigged model looks like:


I was trying to follow the storyboard I created before starting with the animation and I managed to work with it and it was very helpful in the process of animating.
In the first couple of frames the male penguin passes through an open door and notices the red present box on the table. He displays curiosity by peeping into the room behind the wall. He looks around to check if somebody is watching which indicates his cautiousness because he is still not sure if the present is for him. He gets a bit closer and examines the object, the eyebrow movement shows his doubtfulness but keeps his curiosity. When he decides it is safe to get even closer he gets under the table. The scene with the flipper looking above the table gives the character personality and adds a more cartoon-like look of the animation. When he reads the little card by the present his movements get quicker, showing his excitement. While he is opening the gift box he is facing the corner of the room as if he was hiding from someone. But he is not because the present was addressed to him, his behavior shows us that he is shy by nature.
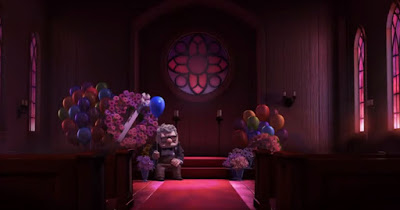
He opens the present and he presents it to the camera...but he is not very fascinated. Why would anyone give him a present with a female ring? This is not a problem because he knows just the penguin who would love this little gift. The movement of the camera, slowly zooming to is eye, sends us to the last scene where he gives the ring to the female penguin. The clumsy way of walking indicates his growing excitement.
Overall, I am happy with the animation, it successfully shows the character thinking, which was the task. It also brings out the character and follows a consistent story. The thing that can be definitely improved is the walking of the character. As he is walking he is tottering, he is being clumsy because of the size of his body and his little legs. But the feel of weight when he is shifting from a foot to foot does not feel quite right. This can be improved by some slight changes on the rig because this is what limited the movement.
Critical Evaluation `Partly Cloudy` by PIXAR Animation Studio
Here is my critical evaluation of the Pixar short animation movie "Partly Cloudy"
The video is available from youtube:
The video is available from youtube:


A study in Body Acting
Body acting is not much different that animating a character..well, it is from a technical point of view, but the animator turns into an actor in the process of animating and should think as one. This skill teaches you on how to express your characters emotions throughout body language. Plus, you have the freedom to exaggerate your animation in a way you can not if you were an actor for instance.
Body acting is a non-verbal way of communication which is one of the most powerful elements that make a believable and dynamic animation. The movements of your character do not always need to be realistic in order to be believable. Here is an example of one very realistic animation :
This example is realistic and believable without any use of exaggeration, squash and stretch or slow in and slow out, but when we animate we also consider the 12 principles of animation. In the next example we can easily see the application of many of those principles which improve the animation and make it more dynamic:
As we can see there are a couple of moments which clearly show the use of squash and stretch, overlapping action and others. Pausing you character for a couple of frames makes a huge impact and brings out the way they are thinking aswell.
Character expressing Fear

Here I posed a character (which I do not own) expressing the emotion Fear. There are several components that build up the emotion and help make it believable. The legs and arms are as close to the body as possible, there is a big curve in the spine, the tail is pointing down and the ears are dropped down. Doing this, the character is trying to get as small as possible, almost invisible. The posture of the hands in front of the face also indicate protection. The slight bend in the front leg has a protective indication aswell. The facial expression has a major role in the expressing of any feeling - in this case, the eyes are wide open and the inner points of the eyebrows are lifted up while the outer corners are pointing down.
Sunday, 11 December 2016
Non-verbal communication
Non-verbal communication or body language is the way humans communicate most of the time (60% to 80%). This is the way of expressing emotions, thoughts and feelings without talking and is also applied in animation movies. It is important to understand how to use it in your work as it can often drive a whole story in the opposite direction.
Everything you can express with your body is considered a non-verbal communication: facial expressions, gestures, paralinguistics, body posture, eye gaze etc. All those components help you build a more believable character with unique traits and personality. It also plays a major role in how you convey what your character is thinking.
https://www.youtube.com/watch?v=jdyll8gBRBc

Wednesday, 30 November 2016
Rocket Animation

For this task I had to create a storyboard for a rocket animation and then create the actual animation following it. The story is expressing the excitement of the little rocket who wants to go to the moon. In the first half of the animation he notices the moon and starts running in circles and bouncing up and down. The little guy gets overexcited and takes off in a clumsy way. Once he lands on the moon he expresses his satisfaction by raising his eyebrows. The emotions have been visualised in the animation pretty well. The only issue I had in the process of animating was the rotation of the body as the rig was not properly set but I think I managed to work with what I had. The follow-through movements of the antenna give the character personality and therefore help the audience better understand his thoughts and feelings.
12 principles of animation
The major thing I notice when I am talking about the 12 pinciples of animation now is that they have become way more noticeable for me than they were a year ago. I started noticing them everywhere, form animation movies I am watching to not-animated movies, even in my every day life when I am socializing with people. And not only I can see the difference between each pinciple but I also find myself thinking about ways to improve them in other peoples work.
They are all equally important when it comes to animating because they help the audience engage with the particular character. In my animations I usually copy my own behavior and movements as I think this helps me a lot with the visualization of my character's thoughts.
They are all equally important when it comes to animating because they help the audience engage with the particular character. In my animations I usually copy my own behavior and movements as I think this helps me a lot with the visualization of my character's thoughts.
Storyboard research
I quite enjoyed doing the research on storyboards using Pinterest.com. It provided me with a range of styles and themes. Before I did the research I already had an idea about my storyboard but I did not have a clear visualisation. After I had a look at the work of other storyboard creators I came up with ideas of how exactly I should visualise my animation idea and how to make it easily understandable. Here is a link to my board in pinterest: https://www.pinterest.com/ra43700/sroryboard-research/?s=3&m=facebook
Wednesday, 19 October 2016
Excitement and how to express it throughout for character?
Excitement is a stage of euphoria and physical activation, it makes us full of adrenaline and active. The most common synonyms are euphoria, enthusiasm, frenzy, ferment. Excitement is mental but it affects the whole body and it has strong physiological responses. It is one of the main things that engages our audience.
The first thing we need to understand when it comes to expressing excitement with our animation is what is the emotion provoked by. It can come from expectancy of an event, the love of doings something etc., but it can also be fueled by another emotion as anger.
How can you pose you character in order to show excitement?

When people are happy or excited of an upcoming event or so they usually start dancing or jumping, clap excessively, rock back and forth etc. Animators usually use personification to their characters so the audience can better engage with the film. That means that their animation is mostly inspired by the feelings and emotions of the people around them or even themselves. Some of the `symptoms` of excitement you can make use of include:

The first thing we need to understand when it comes to expressing excitement with our animation is what is the emotion provoked by. It can come from expectancy of an event, the love of doings something etc., but it can also be fueled by another emotion as anger.
How can you pose you character in order to show excitement?
When people are happy or excited of an upcoming event or so they usually start dancing or jumping, clap excessively, rock back and forth etc. Animators usually use personification to their characters so the audience can better engage with the film. That means that their animation is mostly inspired by the feelings and emotions of the people around them or even themselves. Some of the `symptoms` of excitement you can make use of include:
- bottom lip tucked under and bitten by the teeth
- quick short hops
- energetic movement of the hands
- shivering body
- hands and one leg lifted up
- eyes wide open
What is a good model?
Before starting with the modelling you should have a clear idea of what you are actually trying to achieve. Having some reference images helps with the creation of good proportions which is a very important factor. You should always aim to make your character distinctive. The character must me appealing, strong and interesting in order to catch the audiences eye. For instance, when devising The Simpsons, the creator knew that the bright yellow skin and the unusual design of the characters would grab the attention of the viewer.
The strong topology makes the work of the animator much unchallenging and pleasant. While creating the model it is a good habit to always check for errors like triangles or holes instead of fixing them after you finish. It is essential that you have good edge flow in certain areas of the mesh - usually around the eyes, the shoulders, knees etc. This aspect of modelling matters if you are planning to rig the model for animation because the poorly made model is hard to rig and skin, it also deforms badly when you are animating it.


The strong topology makes the work of the animator much unchallenging and pleasant. While creating the model it is a good habit to always check for errors like triangles or holes instead of fixing them after you finish. It is essential that you have good edge flow in certain areas of the mesh - usually around the eyes, the shoulders, knees etc. This aspect of modelling matters if you are planning to rig the model for animation because the poorly made model is hard to rig and skin, it also deforms badly when you are animating it.
Friday, 14 October 2016
Pose to Pose animation
I created this short pose to pose animation following a Linda,com tutorial which I found on Youtube ( https://www.youtube.com/watch?v=GTQAOPhQLV4 ). I find the tutorial helpful as it covers the basics of creating a pose to pose animation and this is actually all you need to know.
There is also another tutorial ( https://www.youtube.com/watch?v=v8quCbt4C-c ) I found which is really good when it comes to understanding the theory behind this method and the difference between pose to pose and straight ahead. Both methods have their benefits and it is good to know the difference and app;y the method that will work the best for your animation.


Week 2 Storyboard Exercise


The story was influenced by the fact that when male penguins fall in love they search the whole beach in order to find the perfect pebble. When they finally find it they put it right in front the female penguin they like. If she accepts the pebble, they spend their whole life together.
Tuesday, 11 October 2016
What is a good storyboard?
A storyboard is one of those aspects of filmmaking which help you "see" the movie before you have created it. Storyboarding also helps the animator determine whether the shots are dynamic or not. The storyboarding process form widely known today was developed at Walt Disney Productions during the early 1930s in order to help directors visualize the scenes and find potential problems before they occur.
DreamWorks advises film directors and cinematographers to avoid flat staging in their storyboards because the image contains three vanishing points. Thinking in 3-point perspective makes the storyboard appear more dynamic, adds more depth and volume. Drawing a grid also puts the character on an easily discernible plain which helps you gain more control over your character.
In order to add depth, texture and sense of location the use of foreground, mid-ground, background and far background is very helpful.
When dealing with multiple characters one easy way to organize them is labeling, because without some sort of order to how you stage your characters, cutting back and forth between them could be confusing to you, the editor and the audience.

Week 1 Squirrel Animation
This short animation shows a character getting through a obstacle. The main aim of the animation is to visualise what is going on in the characters mind, how he thinks and overcome the obstacle. The animation has some technical issues but it successfully shows the thinking process of the squirrel. In the beginning of the animation the squirrel sees the nut and clearly shows his interest in it by stretching up and opening its mouth in excitement. After the bad camera movement we come to the scene where the character notices that there is an obstacle he needs to overcome. By looking round the squirrel is familiarizing with the situation and starts thinking of a way to solve the problem which lies between him and the nut. We realize the character has a solution when the explanation mark appears above his head. And finally, the character expresses his satisfaction with the great job he did by eating the treat with a smile.
Tuesday, 19 April 2016
Mini Project
For this task I was asked to create a parody of the Pixar intro animation but with my own name.
The animation demonstrates Squash and Stretch in the movement of the body of the squirrel and the letters, which squash and stretch when the character is jumping from one to another. The teeth of the animation character boost its appeal and make it comic. I have demonstrated what I have learned about the Secondary Action, Follow Through and Overlapping Action principles with the animation of the big tail of the squirrel. The tail follows the movement of the body and overlaps with every following jump the squirrel does. The movement of the tail is very important for the whole animation, as it makes it more realistic and believable. I have used it to also express the feelings of the squirrel, for instance, when the squirrel sees the `playground` (my name), its tail stretches up to show the amazement of the character.
I have applied Exaggeration to the movement of the letter `I` when it stretches up really quickly. This contributes to the comedic look of the animation. The big jump that the squirrel does just before it starts playing on the playground proves my skills in the Arcs principle. The character does a really nice and smooth jump and the trajectory demonstrates Arcs perfectly.
The Slow in and Slow out principle is shown in the final fall in the animation. The character falls from the sky very quickly and when it hits the little platform, it slides down to the ground. I have also demonstrated Anticipation in my animation - before two of the jumps, the squirrel anticipates by trembling its tail. This also reveals a lot about the personality of the character and it shows what the character is thinking at the moment.
I have applied the Straight Ahead and Pose To Pose principles for all of the jumps of the character by changing the timing in the graph editor. The movements start slowly, build up and end slowly which helps the final look of the animation, as it prevents it from looking mechanical. Solid Drawing is applied in the animation when the squirrel is bouncing on the letter `A`. The movement gives the character weight, balance and volume. The lighting in my scene also helped for the three-dimensional finish.
Timing is one of the most important principles of the animation as it affects the personality and nature of the animation. I think I have applied the right timing, especially in the last few frames of the animation. The time before the appearance of the squirrel feels just right and again - it contributes to the success of the final product.
I have applied Staging to the movement of the camera which presents the idea of the animation clearly. For instance, when the squirrel is shot up in the sky, the camera goes up and then it turns left and right. This shows that the camera is searching for the object and presents that idea unmistakably.
References:
The model is downloaded from AnimationMentor: http://www.animationmentor.com/free-maya-rig/
Monday, 11 April 2016
Appeal, Exaggeration, Solid Drawing and Staging Examples from `Up`
Appeal:


These two screenshots are in contrast when it comes to the emotion that they express. In the first image we see the love in Ellie's eyes and in the second one they are replaced with Carl's, full of sorrow but also love. The colours in both images are also in contrast as the bright tones in the first screenshot contribute to the happy and energetic atmosphere while the dark shadows convey sadness.

Exaggeration:


In the first screenshot we see Ellie passionately kissing Carl but the actual exaggerated moment is Ellie's behaviour just before the kiss. She is jumping up and down, her eyes widen and she does an exaggerated jump towards Carl.


The second screenshot depicts another exaggerated jump I found. This time, the one jumping is Carl and he does that in order to stop the balloon cart from flying away. Carl's actions are obviously quickened and sudden.
Using exaggeration, the animator can easily reveal a lot about the personality of the character. For instance, Ellie's jump and behaviour before the kiss reveal her excitement and impatience. Carl's jump, on the other hand, demonstrates his bulky gestures. This technique also helps the audience better understand the particular scene.
Solid Drawing:


I find these two examples of Solid Drawing remarkable, as they give the characters the needed depth, volume, weight and balance for creating a realistic three-dimensional animation. In the first screenshot we feel the perfect weight, created by the deep shadows inside the vehicle which are in contrast with the shiny surface of the side view mirror. In the second image the light behind the character gives him volume and balance. The specific angle of the light also makes Carl appear more realistic and believable.
Staging:

According to Ollie Johnston and Frank Tomas, Staging is all about the presentation of any idea, so that it is completely and unmistakably clear. And that is exactly what these two screenshots demonstrate. Even if you have not seen the video above, you could easily say what the general idea of the scenes is. Unfortunately, both of the shots are tragic and saturated with unhappy feelings but that is what the animators were looking for. Staging aims to make you feel the pain, to get you into the characters' shoes.


Straight Ahead Action and Pose to Pose
The `pose to pose` animation method allows the animator to map the action in advance by setting key frames for the main poses and it is very useful if the character has to perform his actions for a preset time.
Before starting with the animation I planned the main poses...


and when I chose them I set key frames.
Then I used a few more poses to fill the inbetweens


Example of Pose to Pose:
https://gifs.com/gif/pYowYX
This is the example of `Pose to Pose` which I found in Disneys` animated movie 'Beauty and Beast' from 1991. As the villain Gaston enters the room, we can clearly see that he is moving from hold to hold with inbetween movements.
Sunday, 10 April 2016
''Thought of You'' - analysis
Directed and Animated by Ryan Woodward
I was asked to analyse the short film
series 'Thought of You' and to give answers to questions, such as what the
feelings does the animation evoke and what role does Arcs play and how does it
affect the whole clip. (I decided to upload the same animation but with a
different background track just because I personally like this version more.)
Everybody is very familiar with the fact that dance has always been a personification of the inner world of a character. And that is exactly what happens in this clip - through their movements, the characters tell a story in a really beautiful and unique way. Arcs enhances the impression over the audience by demonstrating the movement itself and how fast or slow it is.
Very slow movements can be spotted often, too (00:29, 01:16, 01:55) - these moments make the audience impatient. They play the role of a different type of Anticipation, whose main role is not to prepare us for the next action, but to make us look forward to it.
The animation also includes lots of exaggerated moments which make it seem more like a dream than anything else (00:47, 01:25 and 01:52). However, these are the moments that make it seem more realistic because they are the ones that resonate with the audience. Also, they show the dancers' mood and help him express the feelings he has for the other character.
How do I interpret the story?
I think that the two characters represent two different worlds which want to be together but cannot. That is why they keep chasing each other. During the dance the two characters share, they gradually start entering each others' worlds, in order to be together. But in the end they remain separated.
Tuesday, 15 March 2016
Arcs Exercise
This short and simple animation worked really well, since the movement of the lamp-like character is smooth and clear. The trajectory of the head movement feels natural, since it slows out at the end of the action. The antenna also tends to the actions, as it trembles quickly when the character hits the ball and gradually stops at the end.
Secondary Action and Arcs Animation
I decided to combine thee two animation principles, in order to create one more interesting and dynamic animation.
I have applied the Arcs principle in the first few frames when the dog tosses up the ball. Its landing needs improving because the absence of bouncing afterwards makes it seem that the ball is heavier than I want it to be.
The flappy ears (a secondary action) give the dog characterisation, since they make it look more nonchalant and goody. The other thing that contributes to the personality of the dog is the jump. I struggled a lot with deciding how to position the fallen dog but then I thought that the messier the final pose is, the funnier it will be.
Also, the interaction between the falling dog and the ball worked well because the timing seems correct.
''Dinner'' by Birdbox
For this task I will talk about the short animation film 'Dinner' by Birdbox, focusing on the 'Secondary Action' principle.
The dog is so hungry that after catching the scent of his food, he rushes towards it so quickly that he slides across the kitchen floor. During the first few seconds of the animation, the primary action is the dog eating and the secondary action is it wagging its tail, which shows us each emotion the dog is going through.
After he gets his food stuck under one of the kitchen units, the primary action of the dog is getting its head stuck under it and the secondary actions are the bark and the scratching.
After it fails to pull his food out of there, the dog decides to act as it does not care about it anymore and pretends to walk away. The primary action here is the dogs' facial expression, while the secondary ones are its ears, resting tail and slow walk. This scenes reveals the dogs' character.
Further in the video, the dog starts working on a solution to the problem. It attempts to move the bowl of food with a bone and after seeing the progress it had just made - the bowl moves closer to him - it starts quickly wagging its tail. In the next few scenes, the primary actions are the dogs' successful attempts at getting the food to him and the secondary action is the wagging of the tail.
After the food comes out, it starts eating again which becomes the primary action, while the wagging of the tail remains as the secondary one. This remains the same until the dog manages to trap his food again under a kitchen unit on the opposite side. The primary action then becomes its sad look and the secondary actions are the drops of the tail and ears back to resting mode.
Everything that the dog goes through, in order to get to its food, show us how stubborn it is and tells us what the most important thing for a dog is - food.
Thursday, 10 March 2016
Secondary Action: Dog wagging its tail
This is an example of secondary action in real life. As we can see, the attention of the dog is drawn by something out of the frame and it responds with gestures (moving its ears, mouth and wagging its tail) which are the secondary actions.
Secondary Action - 12 Principles of Animation
I find these series very useful, since they strengthen what I already know about a certain principle.
Secondary Action - Squirrel Exercise
This exercise deals with secondary action as the tail is following the movement of the ball, which is the primary action.
The attached tail gives the ball characterisation and personality and it definitely contributes to the success of the whole animation.
The Anticipation before the jump is clear, as the ball squashes to the ground and the tail assists by shooting the whole body up.
When the ball reaches the platform, the tail goes up, making the landing more realistic. In real life this would also help the squirrel to keep balance on the tree. In the last few frames, the tail tucks under the platform which completes the action and enhances the animation.
Wednesday, 2 March 2016
Overlapping Action Exercise
This exercise demonstrates the animation principle Follow Through and Overlapping Action. This principle explains the technique of a character having appendages, such as a cape or a feather on a hat, and how they interact with each other.
In this animation there are antennae, which are attached to the hammers and follow their movement. When I was ready with one of the hammers, I used 'Duplicate Special' to duplicate the keyframes of the hammer and the antennae. The slight bounce of the hammers, as they hit the floor, gives them the feeling of weight.
Overall I am happy with the final product and if I were to redo the animation, I would use more hammers, as it is very pleasing to watch!
Monday, 22 February 2016
Diving Into Pool Ball Exercise
This exercise refers to one of the animation principles, called Anticipation.
The ball Anticipates by Squashing against the springboard. This way it communicates to the audience and prepares for the next action which is the jump.
I am pretty happy with this animation, as the all creates a really nice arc when it jumps. That arc makes the jump more realistic and definitely not mechanical. The trembling of the springboard adds to the effectiveness of the whole animation but after I playblasted the animation, I noticed an issue with the ball. Before it jumps off the surface of the springboard, it goes through it a little.
Anticipation : small and large
The ball to the left shows small Anticipation which doesn't give us much information on what is going to happen. For instance, if the ball was a character who was about to leap into the air, he would have to prepare for the jump by crouching down, in order to build up energy just like a spring. The ball with small Anticipation may still look correct but it does not work well for storyboarding. But on the other hand, the second ball has large Anticipation and it almost looks like a rocket that is tacking off. First it Squashes, then it jumps - this way it builds up energy and takes off with power. The rotation that I have used when the ball Anticipates, gives it even more power which makes the whole animation more believable.
https://gifs.com/gif/5y0Y9v
Here is an example of how important the Anticipation is especially when it is used along with Squash and Stretch. In order to create a more powerful expresion the animator first squashes the face and then stretches it. On the right side of the gif is demonstrated the same character performing the same expresion but it looks rather unfinished in comparison with the one that squashes.
Thursday, 11 February 2016
Newton's cradle
This exercise looks at the principle of Slow In and Slow Out. It turned out to work really well and look realistic and believable. This principle refers to the way that all movements start slow and build up speed during the action. Without Slow In and Slow Out all movements look mechanical. When I did the animation without playing around with the timing, it turned out looking static. To fix that, I used the Graph Editor to create that snappy feeling when the first or the last ball hits the one next to it. This way I avoided the mechanical feeling of the whole animation.
Tennis and Cannon Ball
For this exercise I was asked to demonstrate the principle of Slide In Slide Out in order to show different weight of the objects.
The timing in this animation is the major thing that contributes to the good final product. We know that the tennis ball is way lighter that the cannon one and I had to figure out how to represent that idea using Slide In Slide Out. The high bounces and active rotation of the tennis ball make it appear light and believable. While the slow and clumsy movement of the cannon ball gives it weight and gives the audience to understand the difference between the two balls.
Thursday, 4 February 2016
Example of Bad Timing in Animation
The main reason why the timing is bad is because it seems like the ball is pretty heavy since it falls fast. But after it hits the floor it starts bouncing which makes it looks unrealistic. Also, the bouncing intervals are with different timing and spacing.
If I had to improve this animation, I would change the timing of the fall, making it slightly slower because I think that the creator wanted the ball to be light. Another thing I would change is the timing of the bounces, which would make the ball look more realistic.
If I had to improve this animation, I would change the timing of the fall, making it slightly slower because I think that the creator wanted the ball to be light. Another thing I would change is the timing of the bounces, which would make the ball look more realistic.
Cartoon vs Physics Bouncing Balls: Timing and Spacing
This exercise demonstrates the difference between a cartoon-based bouncing ball and a physics one.
The ball to the left (the cartoon-based one) contains much more exaggeration than the physics one. Although it uses the right amount of squash and stretch the first ball looks not as realistic, as the second one but it still seems correct and understandable because of the good timing I provided.
When I first did the physics-based ball, I didn't apply any squash and stretch because I thought that it would look more realistic. But I was wrong! After doing some research I found out that even objects that seem massive and heavy deform when hitting a surface, so I went back and corrected my mistake. Now it slightly deforms when bouncing off the surface and it looks much more realistic than before.
Dino Animation
This exercise did not work at all... It looks like the dinosaur is hitting the floor too quick but the movement of the legs is good. The reason of the failure with this task is probably because I could not quite understand how the controllers work. There is nothing much to say about this animation except for that I can use it as an example of bad animation in future :D
Thursday, 28 January 2016
Bouncing Balls Light and Heavy
The ball on the left worked very well as it demonstrates weight and good timing. The fast fall also contributes to the efficient animation of the heavy ball. The lighter ball on the other side has a very good beginning as it is rotating more easily and the fall is pretty slow compared to the other one. But the issue is in the very end when the ball bounces of the ground. The timing of the bounces can definitely be improved.
Maya Animation Tutorial for Beginners - Graph Editor
Monday, 25 January 2016
Week 1. Directed study task: Physics/Cartoon bouncing ball

Figure.1

Figure.2
These two bouncing balls are made in the same way using Flipbook. On Figure.1 we see a Physics ball and on Figure.2 - a Cartoon one. The ball on Figure.1 has a smooth and round shape which makes it look more realistic, as the second ball has a rough, edgy and unfinished form which makes it appeal more cartoon-ish. The other difference between the two figures is the surface on which the balls bounce. The floor on Figure.1 is even and smooth compared to the uneven and rough floor on the second figure.
Subscribe to:
Comments (Atom)